Before you begin carving your walking stick, it is essential to learn which woods work best. Learn about the various methods of whittling as well as what David Allen uses for his walking sticks. Also, be sure to read some famous quotes about walking sticks and how to carve them. Here are some tips for carving the perfect walkingstick. Keep reading to learn more. Now you can carve a walking stick that will be a unique, functional piece of art!
Woods that can be used to carve a walking stick
The hardest part of carving is finding the right blank. You may come across a few trees with branches that appear bent too far to be useful, but you should keep searching until you find a straight piece. The ideal time to harvest a straight branch is during the winter months when sap travels from branches to root, making the wood more stable and less likely to split. It's okay to harvest wood while the tree's still green if you cannot wait until spring.
For carving a walkingstick, you can choose from several species of wood. North American chestnut is a strong wood. Because of its density, it is ideal for making walking sticks or other similar tools. This wood grain can be slightly or fully open depending on the species. This wood grain makes a strong walking tool that is solid and smooth. It is also quite attractive and is widely used in carving. You can carve some species with the bark still in place.
Techniques for making a walking stick
A few simple techniques are required to carve a walking sticks. First, select a piece wood with a distinctive texture. Woods can have unique bark patterns and colors. Other woods may have natural swirls. You might want to paint or lacquer these characteristics. To make it more attractive, you can carve the wood shaft. Finally, ensure you choose straight sticks that are free of branch shoots and tough spikes.
This book will explain the differences between different types of wood as well as different carving styles. Most common are snakes and Lions. Other than snakes, it is possible to carve realistic figures, such as fish, deer, and eagles. Many people consider these artists to be God-given. This book can be used by both novice and advanced carvers.
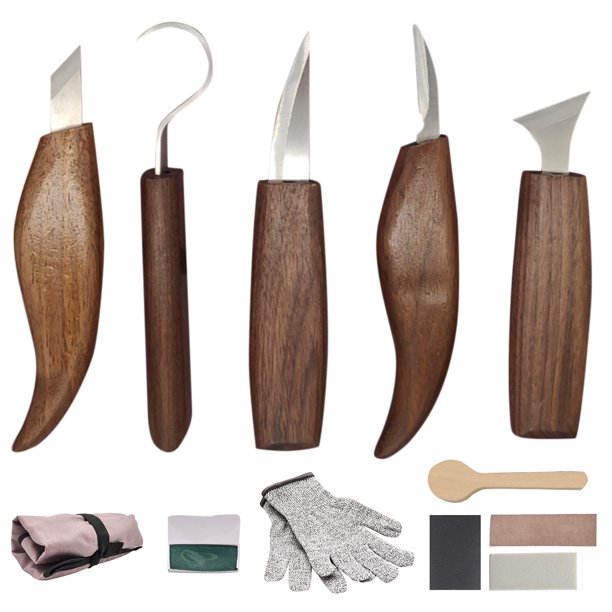
David Allen uses these tools when carving a walkingstick

David Allen was just a small boy when he started to make toys with the pocketknife he had found under his house. It was too dangerous for him to use as a knife and he had it hidden from his family. His creations included toys such as slingshots, and utilitarian objects such as shoeshine boxes. At the age of 15, Allen became disabled and began carving walking sticks. Allen used a pocketknife to cut the wood.
Allen developed his designs independently, digging around the roots of saplings and deciding on what to carve. He believed that the design should be "seeable" before it could ever be carved. This process reminded him of the work of many African American artists. Allen often had visions of the design that he wanted to carve. In this way, he was able to create a stick that would evoke the feelings and emotions of his community.
Famous quotes regarding carving a walking stick
Carving a walk stick is a difficult process. You need a good blank. Straightening the blank is the most difficult part of the entire project. While there are many places to source your stick from, it's important that you persevere until you find one that is straight. Although it may look bent beyond practical utility, you can keep looking until you find one. When sap is flowing from the roots to the branches of the tree, it's best to trim your stick in winter. The sap makes the wood softer and less likely to split.

Consider the wood's texture when choosing wood. Each piece of wood has its own unique texture and color, and may have unique swirls or bark marks. You can enhance the natural swirls by applying lacquer. A smooth finish is possible by choosing a wood shaft that is free from branch shoots and tough spikes. This will make it easier. It doesn't matter what material or finish you choose, but it is worth considering the type of finishing that you will use.
FAQ
What type of wood should I choose?
Oak, maple, cherry and mahogany are the most common wood types used for woodworking. Every type of wood is different and can have a unique look and feel that will affect the final product. For example, oak tends to be darker and harder than other woods. Birch is soft and light, and mahogany is denseer and heavier. You can also choose from solid wood or veneers. Veneers are thin sheets or wood that are glued together into one layer.
Can you teach yourself woodworking?
Doing is the best way to learn any subject. Woodworking is an intricate art form that requires practice, skill, patience, and experience. Any craft requires patience to master.
You can learn the most effective way to master a skill is by actually doing it. Start small, and work your way up from there.
What is the difference between a hobbyist woodworker and a professional woodworker.
Hobbyists love making things from wood while professionals are more concerned with the quality of their work. Hobbyists often take pride in the creations they make and often share them to family and friends. Professionals spend hours researching design ideas before starting to work on a project. They will pay attention to every detail, from selecting the best materials to finishing the project perfectly.
How much should a woodworker charge per hour?
The hourly rate paid to a professional woodworker is dependent on many factors. These include skill level, availability, and location.
The average hourly rate for a skilled woodworker ranges from $20-$50 an hour.
A less experienced woodworker may charge as little as $10 an hour.
Where can I get free woodworking plans?
Free woodworking plans are available online. You don't even need to buy books or magazines. You just need to search Google. Search Google for "free woodworking" to see hundreds of sites that provide free plans.
What else should I know about woodworking in general?
It is easy to underestimate the amount work involved with furniture construction. The hardest part of the process is actually finding the right wood. It can be hard to choose from the many types of wood that are available.
Another problem is that not all wood has uniform properties. Some woods will warp over time, others will split or crack. These things should be considered before you buy wood.
What woods can be used to make furniture?
Woods can be classified according to how hard they are. Softwoods include cedar and pine as well as cedar and cedar. Because they are resistant to rot, softwoods are often used as outdoor furniture. These hardwoods include maple, mahogany and teak. They're generally used indoors because they won't weather well outdoors.
Statistics
- Average lumber prices rose about 600 percent between April 2020 and May 2021. (familyhandyman.com)
- If your lumber isn't as dry as you would like when you purchase it (over 22% in Glen Huey's opinion…probably over 10-15% in my opinion), then it's a good idea to let it acclimate to your workshop for a couple of weeks. (woodandshop.com)
- Most woodworkers agree that lumber moisture needs to be under 10% for building furniture. (woodandshop.com)
- The U.S. Bureau of Labor Statistics (BLS) estimates that the number of jobs for woodworkers will decline by 4% between 2019 and 2029. (indeed.com)
External Links
How To
How to properly use a saw
Hand saws are used for cutting wood into pieces. Most common hand saws include circular saws (jigsaws), table saws and band saws. A hand saw is a tool made from metal or plastic which cuts material such as wood, plastics, metals, etc.
Hand saws have the main advantage of cutting at precise angles without needing to adjust the blade. The blades can also be sharpened easily, which is not possible with power tools. However, they do have some disadvantages. These devices are bulky and heavy so you need to be careful when transporting. Also, if you do not know how to use one, you could easily injure yourself.
There are many different ways to hold a hand saw. You should always keep your hands far away from the blades while cutting. If you don't, you might get hurt. To hold the saw properly, your thumb should be in contact with the blade. This way, you won't accidentally touch the blade.
Use a hand saw only if you don't want anything to be under the piece of wood being cut. Doing this would cause the blade to slip off the wood's surface. Always check the area where you want to cut before starting. Make sure no nails or screws are hidden beneath the wood.
Safety goggles should be worn when using a handsaw. These glasses prevent dust from entering your eyes and make it easier for you to see what's happening. Safety glasses also protect your eyes from flying debris.
If you plan to work with a hand saw, you must first learn how to operate it safely. Then, practice until you feel confident enough to start cutting things. Once you know the basics, it will be easy to cut anything.