It can be difficult to know where to start when you're just starting woodcarving. These are some tips to help you start your first project in animal carving.
Dog
The many free online patterns for dog wood carving will be of great benefit to you if you're an aspiring woodcarver. These patterns will guide your carving of your dog in a variety styles and dimensions. These are the tools that you'll need to carve your pet dog. A band saw or copingsaw, chisels and a mallet are all you will need. You also need some time to sharpen them. Next, you will be ready for carving!
Eagle
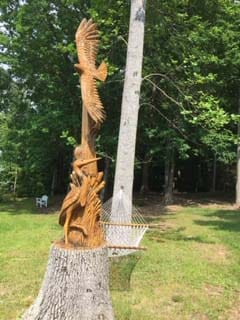
The bald eagle is a traditional symbol of strength, courage, and wisdom to Native Americans. Its primary purpose was to be the creator's messenger. It measures approximately 20 inches in size and 5 inches wide. The eagle today is a popular choice in wood carvings. There are many woods that can be used to carve eagles, including modern and antique. This article will discuss some of the most well-known wood carving styles.
Bear
Carving a wood bear is very simple. There are a few distinct lines and shapes. Each line is heavier than the previous. For more visual interest, bears have their front paws angled in opposition to the leg lines. For those who are just starting out in wood carving, a book can help you create a bear. James Miller's book demonstrates the whole process.
Elephant
An elephant wood carver is a beautiful way to give your home character. 1stDibs has 56 antique carved wooden elephants and two modern pieces. These pieces have been produced as far back as the 19th century, and have become increasingly popular in recent years. You can choose from Art Deco (Mid-Century Modern), Folk Art, or a smaller piece for a subtle addition to your home decor.
Moose
You can carve a moose head or antlers by using moose antlers. Dowels can be used to attach antlers or paddles to moose. They will need to be pushed into place and maybe glued. Then you can paint or color the moose with a walnut gel stains.
Template for the Moose
A moose carving templates helps carvers to create realistic-looking carvings. You can paint moose carvings or stain them with walnut gel. This animal is very easy to carve once you know the basics. For the final touch, add details like fur and eyes with a brush or a typhoon bit on a die grinder. The Moose Template is ideal for beginners who are interested in carving an animal.
Bear template
To begin a bearwood carving, you will need to create a template. Use a Dremel Tool to inspect the wood features. This tool allows you to use stop cuts in order to separate the legs from their lower bodies. To mark the location of splits, you can also make small V cuts in the legs. You can then round the underbelly after you have completed the leg and ear parts. To shape the bear further, make sure you leave a little space at the rear.
Eagle template
Three detailed templates are needed to carve an adult eagle. One template is needed for carving the eagle, while the other one will be used as a work paper template. This will allow you to cut out patterns and use the working paper. As a reference, the third template will be used. Next, you'll use the tools provided to cut out main lines. Make sure that you cut out the lines as close to the pattern line as possible. Make sure all marks are aligned.
Template for mouse
There are many designs available for wood carving beginners. Using a template will make this task much easier, and there are even printable patterns available to help you along the way. For beginners, you can begin with a basic geometric pattern. As you gain experience, you will be able to move on to more complex patterns. Once you've mastered the basics, you'll be on your way to creating the perfect mouse.
FAQ
How long does a piece take to finish?
It depends on the wood type you choose, the complexity and the amount you apply to the finished product. Hardwoods, for example, require more maintenance than softwoods. Hardwoods also tend to be more expensive than softwoods. They are more durable and can withstand moisture better. Finishing furniture can take anywhere from one week up to three months.
How can you calculate the woodworking price?
It is essential to calculate costs as accurately as possible when pricing any project. Always make sure you get the best price on materials. It is also important to consider the costs of other factors, such time, skill, and experience. To get an idea about the average cost for common household DIY tasks, see our guide to the average woodwork project price.
What is the difference between a hobbyist or a professional woodworker, and how can you tell?
Hobbyists enjoy making things out of wood, whereas professionals focus more on the quality of their work. Hobbyists usually take pride in their creations and often share them with friends and family. Before they start working on a project, professionals will spend hours researching the designs. They will pay attention to every detail, from selecting the best materials to finishing the project perfectly.
Where do I start with woodworking?
It is best to actually build furniture to learn how to make it. While you will need tools and make mistakes, you will eventually master the art of building furniture.
Start by choosing a project you'd like to complete. It can be as simple as a small box, or as complex as a complete entertainment center. Once you have chosen a project, locate a local woodworker who is skilled in this kind of work. Ask him or her for advice on what tools you'll need and where to find them. Maybe you can ask the person if they know of anyone who does this sort of work.
Where can I find free woodworking plan?
Woodworking plans can be found online without the need to purchase books or magazines. You only need to Google search. Simply type "free woodworking” into the search box and you'll find hundreds of websites that offer free plans.
Statistics
- Most woodworkers agree that lumber moisture needs to be under 10% for building furniture. (woodandshop.com)
- Average lumber prices rose about 600 percent between April 2020 and May 2021. (familyhandyman.com)
- Woodworkers on the lower end of that spectrum, the bottom 10% to be exact, make roughly $24,000 a year, while the top 10% makes $108,000. (zippia.com)
- The U.S. Bureau of Labor Statistics (BLS) estimates that the number of jobs for woodworkers will decline by 4% between 2019 and 2029. (indeed.com)
External Links
How To
How to properly use a handsaw
Hand saws can be used to cut wood into small pieces. The most common types of hand saws are circular saws, jigsaws, table saws, band saws, saber saws, crosscut saws, miter saws, and rip saws. A handsaw is a tool made out of metal or plastic that cuts material such wood, plastics, metals etc.
A hand saw's main benefit is its ability make precise cuts at any angle, without the need to adjust it. It is also very easy to sharpen them, unlike power tools. They do have their disadvantages. You must be careful when transporting them, as they can be heavy and bulky. Also, if you do not know how to use one, you could easily injure yourself.
You can hold a handsaw in many ways. You should always keep your hands far away from the blades while cutting. If you don't, you might get hurt. While holding the saw, make sure you place your fingers around its handle. Keep your thumb close to the blade. You won't accidentally touch it.
You should not place anything underneath the wood you are cutting with a handsaw. This could cause the blade to slip from the wood's surface. Before cutting, be sure to check the area. Check for nails, screws and other objects underneath the wood.
Safety goggles should be worn when using a handsaw. They protect your eyes from dust, which makes it easier to see what is happening. Safety glasses also protect your eyes from flying debris.
First, learn how to safely use a hand saw. Next, practice until your confidence is high enough to begin cutting. Once you are comfortable with the basics, you will be able cut almost any material.