
There are various types of joinery wood. They are the Mitered, Tongue, and groove and pocket-hole joints. Let's take a closer look at them. Once you have an understanding of the roles of each one, you can easily build a beautiful piece of furniture. This article will help you understand the different joinery methods. Hopefully, you'll feel more confident and knowledgeable about their benefits and applications.
Mitered butt joint
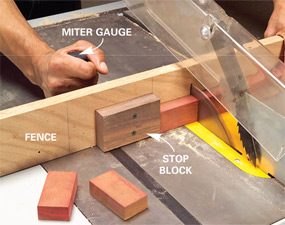
The common type of joinery used for joining pieces of wood is the mitered, butt joint. To form a 90 degree corner, this joint uses two boards that have 45-degree cuts at both ends. This joint can also be used to create irregular shapes. Its strength is similar to that of a traditional wood butt joint. However, it is less strong than edge to edge joints.
A mitered butt joint can be held together using glue or nails. To avoid splitting, you should drill a pilot hole prior to mitering. Another option is to use a pin-nailer, which is a pneumatic tool using tiny brad nails to hold together the wood. They have a very small head so that they do not show up once the wood is screwed in.
Joint with mitered groove
A mitered groove joint is a joint made of joinery wood that has a 45-degree angle between two pieces. By laying two pieces of timber together and then cutting out the grooves, you can create a miter-joint. The process will be safer and more efficient if the wood is still square. Once the grooves are cut, place a spline into the gap. Fix the spline by nailing or glueing it in place.
The Mitered joint is another variation on the traditional biscuit joint. It's made by cutting a groove into a piece of wood, then gluing them together. This type of joint is commonly used for solid panels made with different types of wood. It is more difficult to see than a traditional wood joint because the joinery is invisible. You should always cut along the same side that the wood is being joined when using a biscuit join.
Tongue and groove joint
A tongue-and groove joint made from joinery wood is a very common construction. However, there are many different ways of making it. A table saw is an excellent choice to make this joint. It can create it with one blade on the grooves or a dado-stack in one pass. A router table can, on the contrary, be fast and efficient. It allows you to match bits to make tight tongue and groove joints.
A tongue-and groove joint is a good way to connect different pieces of timber. This joint is used in cabinetry of high quality, but it can also be used in other applications. This joint is used by some wood flooring as well as architectural panels, cabinet doors, and faces frames. It is easy to assemble and can be used as a drawer tracking. If you're not confident with tools and can't afford to hire a joiner, you can make your own with a simple plane or saw.
Pocket-hole joint
The most commonly used type of pocket hole joint is made from wood. It can be used on two of three sides of the wood, which is the face and the edge grain. However, it cannot be used on the end grain. Because of this, it is important to know how to use pocket-hole joinery and how to adjust the jig or stop collar to ensure a perfect fit. Pocket-hole joinery is the best way to create a pocket-hole joint for beginners.
To create a pocket-hole join, you will need to drill a hole through a piece of wood with at least one and a half inches in depth. You can drill these holes accurately with a pocket hole jig. A cordless drill is required to use a Pocket-hole Jig. You can also make a pocket-hole joint using a Porter-Cable PC560.
FAQ
How can you calculate woodworking pricing?
It is essential to calculate costs as accurately as possible when pricing any project. Make sure you're getting the best prices on materials. You should also consider other factors that could impact the cost of your project, such as experience, skill level, time, and money. Check out our guide on the average cost of common DIY projects to get an idea of how much you can spend on woodwork projects.
Where can I begin with woodworking
Building furniture is the best way to learn how furniture is made. You will need tools. There are bound to be mistakes. But if your persistence is consistent, you will soon master the craft.
First, choose a project you would like to complete. You could make something as simple or complex as a box. Or you could build a whole entertainment center. Once you've decided on a project, find a local woodworker who specializes in that kind of work. Ask your local woodworker to help you determine the right tools for you and where they are located. You might even ask whether there's someone else you can talk to who does this kind of work.
How long does it take for furniture to be finished?
It depends on the type of wood you choose, the complexity of the design, and the amount of finishing you apply. For example, hardwoods require more maintenance than softwoods. Hardwoods are also more expensive than softwoods. They last longer and are more resistant to moisture. Finishing furniture can take anywhere from one week up to three months.
You can learn how to woodwork.
It is best to do it yourself. Woodworking is an art that takes patience, practice, skill and experience. Every craft takes practice and patience.
It is the best way to learn to do something is to actually do it. Start small and then build upon what you've learned.
Is it necessary to be a genius in woodworking to succeed?
No. It is not rocket science to woodwork. To create stunning works of art, anyone can learn to use basic power tools.
What kind tools do carpenters use to build?
A hammer is the most commonly used tool by carpenters. A hammer is useful for driving nails into wood. It also helps them hold pieces together while they are working on a project. Other tools include clamps, pliers, screwdrivers, measuring tape, pencils, saws, drills, and wrenches.
Are there any other things I should know regarding woodworking?
It is easy to underestimate how much work it takes to make furniture. Finding the right kind of wood is the most difficult part. It can be hard to choose from the many types of wood that are available.
A problem is that wood doesn't have the same properties. Some woods will warp over time, others will split or crack. Before purchasing wood, you should consider these factors.
Statistics
- If your lumber isn't as dry as you would like when you purchase it (over 22% in Glen Huey's opinion…probably over 10-15% in my opinion), then it's a good idea to let it acclimate to your workshop for a couple of weeks. (woodandshop.com)
- Woodworkers on the lower end of that spectrum, the bottom 10% to be exact, make roughly $24,000 a year, while the top 10% makes $108,000. (zippia.com)
- In 2014, there were just over 237,000 jobs for all woodworkers, with other wood product manufacturing employing 23 percent; wood kitchen cabinets and countertop manufacturing employing 21 percent. (theartcareerproject.com)
- The best-paid 10 percent make $76,000, while the lowest-paid 10 percent make $34,000. (zippia.com)
External Links
How To
How to join two pieces of wood together without nails
Woodworking is a hobby that many people enjoy doing. It is relaxing and enjoyable because you can create something useful with wood. There are times when two pieces of wood need to be joined together. This article will teach you how to do this to keep your woodwork projects looking great.
First, remove any sharp edges from the wood pieces before you join them. You don't want to leave sharp corners that could cause problems later on down the road. Now you can start gluing the boards together.
You should only glue one side of hardwood. Use glue on both the sides for softwoods, such as cedar or pine. Press the boards down until the glue is fully incorporated. Before you proceed to the next step, be sure to let the glue dry completely.
After you glue your boards together, drill holes at the joints where screws will be inserted. Depending on the type of screw that you use, the size of these holes will vary. For example, if you intend to use 1/2-inch wood screws, you need to drill a hole that is at most 3/4 inches deep.
Once you have drilled the holes, the next step is to drive your screws through the joint into the board's backside. Do not hit the boards' front surfaces. It will ruin the finish. When driving the screws, try to avoid hitting the ends of the screws too much. This will avoid splitting in the wood's ends grain.
After your project is completed, you will need to protect it from the weather. You have two options: seal the whole furniture piece or just the top. Either way, you'll want to use a product that will last for years to come. You can choose from oil-based varnishes or polyurethane, shellac and lacquer as examples.
These products can usually be found at any home improvement store. You should make sure you are getting the right type for the job. Remember that some finishes can be toxic, so you should not use them indoors. Always wear protective gear when handling any of these finishes.