This guide will show you how to make intarsia wood art. This guide will help you learn about wood types, patterns as well tools and techniques. You can read on to learn about this amazing craft. Depending on your skill level, you may also want to consider working with a different type of wood. For those who are just starting out in this craft, it is a good idea to make a sample.
Patterns
You can make intarsia ornaments for holiday, Christmas, and tree occasions if you're a good woodworker. This book contains intarsia wood patterns that are suitable for all levels of skill and showcase the artfulness of the process. 21 full-size Intarsia Patterns are included. There is also helpful information regarding shaping, wood and blades.
Intarsia, which uses contrasting wood species to create furniture and wall hangings, is a fun and unique way to make a piece of furniture. It's like building a puzzle, with different pieces of wood arranged next to each other. The wood is then stained or polished and each piece is then assembled to give the project depth and character. You will be able to make intarsia wooden patterns, but they can be very difficult to make.
Tools
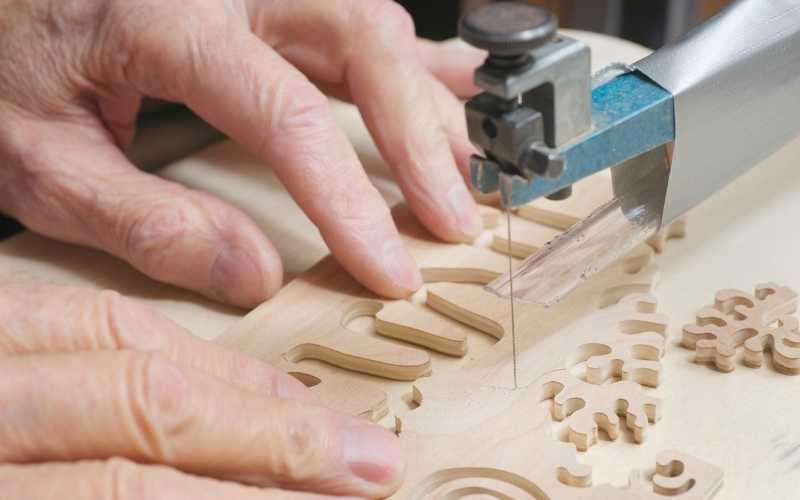
To create the best intarsia, you will need to use special tools for intarsia wood. A belt sander can be used to quickly remove material and smoothen edges. A dremel and flex shaft are useful tools to shape or sand small details. You will find different tools and blades for shaping small areas.

Jigsaws: Jigsaws are great at cutting wood, but they cannot do the intricate cuts that scrollsaws can. Sanders are needed to smoothen the wood surfaces. Intarsia woodworking requires two different types of wood that contrast in color and grain. The wood can then be stained in a variety of ways. After the wood has been cut, it is sanded to form a mosaic-like pattern.
Techniques
It is easy to create stunning intarsia pieces if you use the correct techniques. A pattern can serve as a starting point for artistic creativity. You'll be well on the way to creating stunning pieces of intarsia wooden art with these ideas. Here are some methods:
First, select the project design. Make duplicates of your pattern. Next, decide which species of wood to use. Different wood species have different characteristics. Your project will have a deeper and more interesting dimension if you rough out the thickness of each wood piece. You can also add pieces by glueing on additional layers of wooden. Finalize your project by removing all backing and leaving the finished intarsia.
Woods for use
The new book provides the tools and techniques you need to make unique inlaid pieces. With Kathy's progressive approach to teaching, you'll learn about everything from the basics to the nuances of color breaks. Even if intarsia is something you have never done before, you will find yourself using this book to learn more about the fascinating craft.
First, make sure you choose woods with the same grain orientation and that complement each others. A teddy for example requires 20 pieces of wood made from four different types of wood, each with a slightly different grain. This means you'll need a saw with a high-speed blade. Once you have established the wood's color and orientation, it's time to start cutting and staining.
Colors

Intarsia wood comes in a variety of colors. Heartwoods are reddish brown or gray black, while saps are white. Some woods, such as cherry, darken with age. Cherry's initial tone is light, but it becomes medium-colored when exposed in the sun. Cedar and other woods like it have varying tones. This allows you to add depth to your project.
Intarsia refers to a type art made by joining different pieces of wood together and creating patterns. It is often associated today with Italy but its origins are in the Islamic world. To create a three-dimensional effect in woodwork, they use different shades and thicknesses of wood. Intarsia can be found on jewelry boxes or wooden chests.
Time-consuming process
Intarsia involves complex techniques and different wood types. Artists will need to gather different types of wood, stains and paints in order for them to create stunning intarsia art. Birch and plywood are two common types of wood to use, but other types are also suitable. Artists have the freedom to choose which wood they like. Intarsia projects are often created by craftsmen who prefer Western Red Cedar.
The first step in intarsia woodworking is to cut and label the pieces of the inlay. Next, the artist glues the pieces together. After the glue has dried, the woodworker finishes each piece by adding a double bevel inlay. This process is time-consuming and requires a lot skill. However, the final product is truly an art piece.
FAQ
Can I succeed in woodworking if I'm a genius?
No. No. Woodworking isn't rocket science. It is possible to learn basic tools and techniques that will allow you to create beautiful art.
How can I determine which tools are most suitable for me?
When shopping for tools, it helps to think about your needs and preferences. Do you prefer metal handles or plastic? What size nails and screws do you usually use? Do you prefer hand tools over power tools?
Do you have the skills to learn woodworking?
Doing is the best way to learn any subject. Woodworking is an intricate art form that requires practice, skill, patience, and experience. It takes time to master any craft.
To actually learn something is the best way. Start small and learn from your mistakes.
What is the minimum investment a hobbyist needs to make in order to get started?
If you're looking to start your own woodworking business, you'll probably need some capital to buy the necessary tools and supplies. The best place to start is by buying a small drill press, circularsaw, circular saw or sanding machine. These items aren't very expensive, so you won't break the bank.
Statistics
- In 2014, there were just over 237,000 jobs for all woodworkers, with other wood product manufacturing employing 23 percent; wood kitchen cabinets and countertop manufacturing employing 21 percent. (theartcareerproject.com)
- Most woodworkers agree that lumber moisture needs to be under 10% for building furniture. (woodandshop.com)
- Overall employment of woodworkers is projected to grow 8 percent from 2020 to 2030, about as fast as the average for all occupations. (bls.gov)
- If your lumber isn't as dry as you would like when you purchase it (over 22% in Glen Huey's opinion…probably over 10-15% in my opinion), then it's a good idea to let it acclimate to your workshop for a couple of weeks. (woodandshop.com)
External Links
How To
How to properly use a saw
Hand saws can be used to cut wood into small pieces. Hand saws come in many forms, including circular saws. A hand saw is a tool made from metal or plastic which cuts material such as wood, plastics, metals, etc.
The main advantage of using a hand saw is its ability to make precise cuts at any angle without adjusting the blade. They are also easy to sharpen, unlike power tools. They do have their disadvantages. These devices are bulky and heavy so you need to be careful when transporting. It is possible to injure or damage your own body if the instructions are not clear.
There are many ways to hold a handheld saw. While cutting, it is important to keep your hands clear of the blades. If you don't, you might get hurt. While holding the saw, make sure you place your fingers around its handle. Keep your thumb close to the blade. This will prevent you from accidentally touching the blade.
It is important to not put anything under the piece you are cutting when using a handheld saw. This would result in the blade slipping off the wood's surface. Always check the area where you want to cut before starting. Check for nails, screws and other objects underneath the wood.
While working with a saw, you should always use safety goggles. These glasses prevent dust from entering your eyes and make it easier for you to see what's happening. Safety glasses protect your face against flying debris, which is another reason they are useful.
First, learn how to safely use a hand saw. Next, practice until your confidence is high enough to begin cutting. Once you've mastered the basics, you'll find that you can easily cut almost anything!