You can find a variety of patterns for a scroll saw on the internet, including many holiday ones. These patterns can also be used to make Santa mobiles, baskets, and even nightlights! Get one now! Look through other patterns until you find the one you love. Scroll saws offer endless possibilities and are very versatile. So why not have fun with other patterns to create something totally unique?
Scroll saw for simple pattern projects
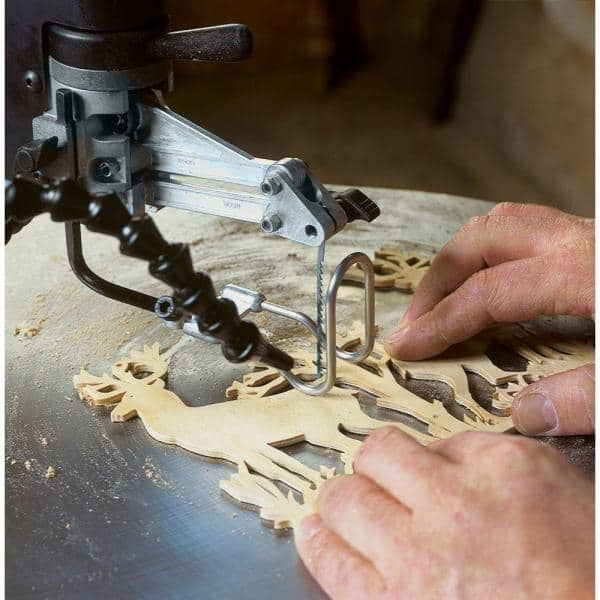
An essential skill for any scroll saw owner is the ability to create patterns. There are many types of patterns, including those that have been adapted from papercraft, quilting and stenciling. Patterns can be created with high-contrast images that look like they were hand-drawn. Learn how to use your scrollsaw by following these step-by–step tutorials. You can find many of these patterns in woodworking publications and magazines.
Simple Pattern Projects Using a Scrollsaw is a great source of information for beginners. It includes 28 projects and instructions for selecting the right wood and supplies. You can also create your own designs in the section. While you might be tempted to stick with patterns that are already in existence, there are other ways to get started with your scroll saw. You can make a wooden bird, a wood heart or a silhouette for a dog.
With a scroll saw, create a Santamobile
It is fun to create a Christmas tree-shaped Scroll Saw Mobile. To match Santa Claus's red Santa Claus, the first step is to cut two stars. You can then make a Santa Mobile by making two holes in each star and one point on the top. The pieces can be connected using coiled wire and hung by hanging the mobile.
Scroll saw patterns can be downloaded online. These range from simple 2-piece designs to complex 3D patterns. Many scroll saw patterns are available online for free; some even printable. You can then choose a design and get started. There are many options. You can make a Santa Mobile with a scroll saw. It's a great way for holiday preparation. To sell the pieces, you can cut them out in multiple pieces.
Make a basket using a scroll saw

If you've ever wanted to try your hand at woodworking, making a basket with a scroll saw is an easy way to do it. A scroll saw and basic woodworking skills are all you need to make a basket. The full-size scrollsaw patterns will amaze you at the ease and speed of this project. What's the best part? It will take you no time to assemble your new creation.
This book will show you how to create beautiful, functional baskets, from start to finish. The scroll saw is required to make the baskets. This book will help you do this. The book is divided in four sections: the base and the rings, as well as the handle. For each ring, four 1/16" (2mm ) bits will be needed as well as an #3 MGT blade.
A scroll saw creates a nightlight
A scroll saw can be used to create stunning nightlights. You can find many scroll saw patterns for nightlights that are easy to use for beginners. These projects can be constructed quickly and showcase your sawing skills. Follow these steps to learn how to make a nightlight from a scrollsaw.

A scrollsaw is a powerful tool for cutting intricate shapes. The scroll saw's vertical blade can be swiveled to create curved cuts. Scroll saws are versatile, portable and easy to use. One feature you can look for is a patent-pending feature that reduces vibrations. This allows you to use it without the need for a heavy desk. Scroll saws often have secure locking mechanisms that allow attachments and blades to be attached.
FAQ
Do I have to refinish my furniture?
Yes! There are many options for refinishing furniture that you don't need to hire a professional. Here are some ideas:
Sandpaper can be used to remove stains and scratches. Finally, use a clean cloth or sponge to clean the surface.
Apply clear polyurethane finish. Allow furniture to dry completely before you move it around.
Use acrylic paint to paint furniture.
Use stain instead of paint. The furniture will have a rich look thanks to the stain.
Shellac wax can be applied. Wax will protect the wood and add shine.
What is the difference between a hobbyist woodworker and a professional woodworker.
Hobbyists enjoy making things out of wood, whereas professionals focus more on the quality of their work. Hobbyists usually take pride in their creations and often share them with friends and family. Professionals will spend hours looking at designs before they start to build a project. They will pay attention to every detail, from selecting the best materials to finishing the project perfectly.
What kind of wood should you use?
Oak, maple, cherry and mahogany are the most common wood types used for woodworking. Every type of wood is different and can have a unique look and feel that will affect the final product. For example, oak tends to be darker and harder than other woods. Birch is lightweight and soft while mahogany is heavier and denser. You can also pick between veneers and solid wood. Veneers consist of thin sheets made from wood and glued together to form a single layer.
How can I determine which tools are most suitable for me?
It's important to consider your preferences and needs when buying tools. Do you prefer metal or plastic handles What size screws or nails do you prefer? Do you prefer to use hand tools or power tools?
Are there any other things I should know regarding woodworking?
It's easy to underestimate the amount of work involved in making furniture. The hardest part of the process is actually finding the right wood. There are so many wood options that it can be difficult to choose the right one.
The problem with wood is that not all wood properties are the same. Wooden can split or crack, while some woods may warp. Before purchasing wood, you should consider these factors.
How can I keep my shop organised?
A designated place to store your tools is the first step towards keeping your workshop clean. You want your tools to stay clean and free from debris and dust. Pegboard hooks can be used to hang tools and accessories.
Do I have the potential to make a decent living doing this?
Yes! Many woodworkers have this ability. According to the U.S. Bureau of Labor Statistics in May 2012, the median annual income for woodworkers was $34,000 This is much higher than the national median of $31,000 per annum.
Statistics
- If your lumber isn't as dry as you would like when you purchase it (over 22% in Glen Huey's opinion…probably over 10-15% in my opinion), then it's a good idea to let it acclimate to your workshop for a couple of weeks. (woodandshop.com)
- Overall employment of woodworkers is projected to grow 8 percent from 2020 to 2030, about as fast as the average for all occupations. (bls.gov)
- In 2014, there were just over 237,000 jobs for all woodworkers, with other wood product manufacturing employing 23 percent; wood kitchen cabinets and countertop manufacturing employing 21 percent. (theartcareerproject.com)
- Average lumber prices rose about 600 percent between April 2020 and May 2021. (familyhandyman.com)
External Links
How To
How to join hardwood without using nails
Woodworking is a hobby that many people enjoy doing. Woodworking is a relaxing hobby that allows you to use your hands to create useful things from wood. However, there are times when you want to join two pieces of wood together without having to use nails. This article will explain how to do this so that your woodwork projects stay beautiful.
You will first need to trim the edges of your wood pieces before joining them. Do not leave any sharp corners as they could cause problems down in the future. Once you've done this, you're ready to start gluing your boards together.
If you are working on hardwood, you should only use glue on one side. If you're using softwoods like pine or cedar, you should put glue on both sides. Once the glue has dried, press the boards together until they are fully adhered. Be sure to let the glue dry before you move on to the next step.
After you have glued the boards together, drill holes in the joints where you intend to place screws. These holes will differ depending on the type and size of screw you are using. For example, if you're going to use a 1/2-inch wood screw, then you should drill a hole that is at least 3/4 inches deep.
Once you have drilled your holes you will need to drive the screws through each joint and into the backside. Be careful not to hit the front surface of the board, or else you'll ruin the finish. Avoid hitting the screws' ends too often when driving screws. This will prevent the wood from splitting.
Protect your finished project now. You can seal the furniture pieces or cover the top. You want it to last years, so you can use any product. Some examples include oil-based varnishes, polyurethane, shellac, lacquer, etc.
These products can be found in most home improvement shops. Be sure to choose the right one for your project. Also, remember that some finishes are toxic and should never be used indoors. Always wear protective gear when handling any of these finishes.